Example 2:
Mount a local docker volume named data (must be created if not already present) in the container as /imagedata.
nvidia-docker run -ti --rm -v data:/imagedata nvcr.io/nvidia/ < repository>:< tag>
SLURM (Simple Linux Utility for Resource Management) is an open source, fault-tolerant, and highly scalable cluster management and job scheduling system for large and small Linux clusters. SLURM requires no kernel modifications for its operation and is relatively selfcontained. As a cluster workload manager, SLURM has three key functions.
First, it allocates exclusive and/or non-exclusive access to resources (compute nodes) to users for some duration of time so they can perform work.
Second, it provides a framework for starting, executing, and monitoring work (normally a parallel job) on the set of allocated nodes.
Finally, it arbitrates contention for resources by managing a queue of pending work.
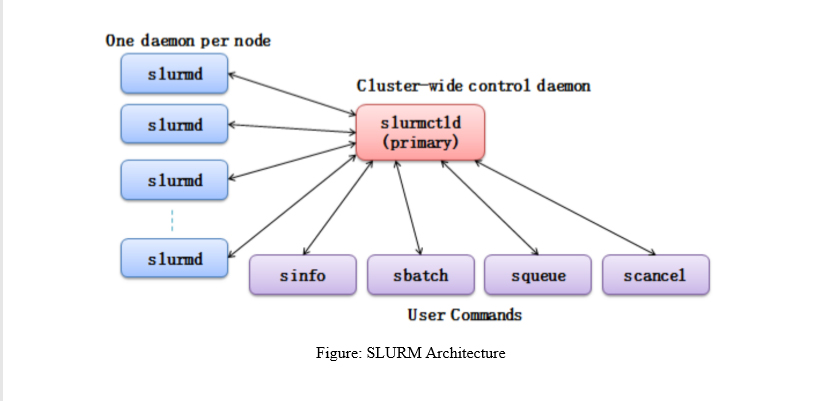 SLURM Commands for the User.
1. SBATCH: Submit a batch script to SLURM
sbatch < SCRIPT NAME >
2. SQUEUE: View information about jobs located in the SLURM scheduling queue.
2.1 SQUEUE is used to view job and job step information for jobs managed by SLURM.
squeue < JOB ID >
3. SINFO: View information about SLURM nodes and partitions. SINFO is used to view 3. partition and node information for a system running SLURM.
sinfo
4. SCANCEL: Used to signal jobs or job steps that are under the control of SLURM
scancel < JOB ID >
Sample SLURM Job Script
#!/bin/sh #SBATCH --job-name=tf_job_test
# Job name #SBATCH --ntasks=1
# Run on a single CPU #SBATCH --time=02:00:00
# Time limit hrs:min:sec
#SBATCH --output=tf_test_%j.out
# Standard output and error log
#SBATCH --cpus-per-task=1
#SBATCH --gres=gpu:1
#SBATCH --mem=32GB
echo $CUDA_VISIBLE_DEVICES
NV_GPU=$CUDA_VISIBLE_DEVICES nvidia-docker run -t ${USE_TTY} --name $SLURM_JOB_ID -user $(id -u):$(id -g) -rm -v /home/$USER:/home/$USER nvcr.io/nvidia/tensorflow:19.04-py3 python -c 'import tensorflow as tf; print(tf.__version__)'
To run a container, you must issue the nvidia-docker run command, specifying the registry, repository, and tags.
Before you can run an nvidia-docker deep learning framework container, you must have nvidiadocker installed.
a. As a user, run the container interactively.
nvidia-docker run -it --rm -v local_dir:container_dir nvcr.io/nvidia/
The following concepts describe the separate attributes that make up the both commands.
nvcr.io
The name of the container registry, which for the NGC container registry and the NVIDIA DGX container registry is nvcr.io.
nvidia
The name of the space within the registry that contains the container. For containers provided by NVIDIA, the registry space is nvidia.
-it
You want to run the container in interactive mode.
--rm
You want to delete the container when finished.
-v
You want to mount the directory.
local_dir
The directory or file from your host system (absolute path) that you want to access from inside your container. For example, the local_dir in the following path is /home/user/data/mnist.
-v /home/user/data/mnist:/data/mnist
If you are inside the container, for example, using the command ls /data/mnist, you will see the same files as if you issued the ls /home/user/data/mnist command from outside the container.
container_dir
The target directory when you are inside your container. For example, /data/mnist is the target directory in the example:
-v /home/user/data/mnist:/data/mnist
< xx.xx>
The tag. For example, 19.04-py3.
b. From within the container, start the job that you want to run. The precise command to run depends on the deep learning framework in the container that you are running and the job that you want to run. For details see the /workspace/README.md file for the container.
1.1 nvidia-docker run
When you run the nvidia-docker run command:
The Docker Engine loads the image into a container which runs the software.
You define the runtime resources of the container by including additional flags and settings that are used with the command. These flags and settings are described in the following sections.
The GPUs are explicitly defined for the Docker container (defaults to all GPUs, can be specified using NV_GPU environment variable)
1.2 Specifying a User
Unless otherwise specified, the user inside the container is the root user.
When running within the container, files created on the host operating system or network volumes can be accessed by the root user. This is unacceptable for some users and they will want to set the ID of the user in the container. For example, to set the user in the container to be the currently running user, issue the following:
nvidia-docker run -ti --rm -u $(id -u):$(id -g) nvcr.io/nvidia/ < repository>:< tag>
Typically, this results in warnings due to the fact that the specified user and group do not exist in the container.
You might see a message similar to the following:
groups: cannot find name for group ID 1000I have no name! @c177b61e5a93:/ workspace$
The warning can usually be ignored.
1.3 Setting The Remove Flag
By default, Docker containers remain on the system after being run. Repeated pull or run operations use up more and more space on the local disk, even after exiting the container. Therefore, it is important to clean up the nvidia-docker containers after exiting.
Note: Do not use the --rm flag if you have made changes to the container that you want to save, or if you want to access job logs after the run finishes.
To automatically remove a container when exiting, add the --rm flag to the run command.
nvidia-docker run --rm nvcr.io/nvidia/< repository>:< tag>
1.4Setting The Interactive Flag
By default, containers run in batch mode; that is, the container is run once and then exited without any user interaction. Containers can also be run in interactive mode as a service.
To run in interactive mode, add the -ti flag to the run command.
nvidia-docker run -ti --rm nvcr.io/nvidia/< repository >:< tag >
1.5 Setting The Volumes Flag
There are no data sets included with the containers, therefore, if you want to use data sets, you need to mount volumes into the container from the host operating system.
Typically, you would use either Docker volumes or host data volumes. The primary difference between host data volumes and Docker volumes is that Docker volumes are private to Docker and can only be shared amongst Docker containers. Docker volumes are not visible from the host operating system, and Docker manages the data storage. Host data volumes are any directory that is available from the host operating system. This can be your local disk or network volumes.
Mount a local docker volume named data (must be created if not already present) in the container as /imagedata.
nvidia-docker run -ti --rm -v data:/imagedata nvcr.io/nvidia/ < repository>:< tag>
1.6 Setting The Mapping Ports Flag
Applications such as Deep Learning GPU Training System™ (DIGITS) open a port for communications. You can control whether that port is open only on the local system or is available to other computers on the network outside of the local system.
Using DIGITS as an example, in DIGITS 5.0 starting in container image 16.12, by default the DIGITS server is open on port 5000. However, after the container is started, you may not easily know the IP address of that container. To know the IP address of the container, you can choose one of the following ways:
Expose the port using the local system network stack (--net=host) where port 5000 of the container is made available as port 5000 of the local system. or
Map the port (-p 8080:5000) where port 5000 of the container is made available as port 8080 of the local system.
In either case, users outside the local system have no visibility that DIGITS is running in a container. Without publishing the port, the port is still available from the host, however not from the outside.
1.7 Setting The Shared Memory Flag
Certain applications, such as PyTorch™ and the Microsoft® Cognitive Toolkit™, use shared memory buffers to communicate between processes. Shared memory can also be required by single process applications, such as MXNet™ and TensorFlow™, which use the NVIDIA® Collective Communications Library ™ (NCCL).
By default, Docker containers are allotted 64MB of shared memory. This can be insufficient, particularly when using all 8 GPUs. To increase the shared memory limit to a specified size, for example 1GB, include the --shm-size=1g flag in your docker run command.
Alternatively, you can specify the --ipc=host flag to re-use the host's shared memory space inside the container. Though this latter approach has security implications as any data in shared memory buffers could be visible to other containers.
1.8 Setting the Restricting Exposure of GPUs Flag
From inside the container, the scripts and software are written to take advantage of all available GPUs. To coordinate the usage of GPUs at a higher level, you can use this flag to restrict the exposure of GPUs from the host to the container. For example, if you only want GPU 0 and GPU 1 to be seen in the container, you would issue the following:
NV_GPU=0,1 nvidia-docker run ...
This flag creates a temporary environment variable that restricts which GPUs are used. Specified GPUs are defined per container using the Docker device-mapping feature, which is currently based on Linux cgroups.
1.9 Container Lifetime
The state of an exited container is preserved indefinitely if you do not pass the --rm flag to the nvidia-docker run command. You can list all of the saved exited containers and their size on the disk with the following command:
docker ps --all --size --filter Status=exited
The container size on the disk depends on the files created during the container execution, therefore the exited containers take only a small amount of disk space.
You can permanently remove a exited container by issuing:
docker rm [CONTAINER ID]
By saving the state of containers after they have exited, you can still interact with them using the standard Docker commands. For example:
You can examine logs from a past execution by issuing the docker logs command.
docker logs 9489d47a054e
You can extract files using the docker cp command.
docker cp 9489d47a054e:/log.txt.
You can restart a stopped container using the docker restart command.
docker restart < container name>
For the NVCaffe™ container, issue this command:
docker restart caff
You can save your changes by creating a new image using the docker commit command.